
Dear friends, what a week. We ended up taking down the walls in our basement bathroom after some flooding, our interent went down and we're on an epic cross country road trip (AS WE SPEAK).
So, the give away winner will be in a follow up post. And without further ado, here is Eric's recipe for gluten free chicken strips. No one will ever know they are gluten free!
Heat about 6-12 cups of oil (depending on how many you are making) to 350 (start it on medium high and let it rise to the temp gradually. We have one of those thermometers that has a clip on the side that you can put into the oil. Don't put it all the way to the bottom where it's touching the metal because you'll get a false temp but put it in the middle (as much as possible) and that should be good. Once the chicken is in the oil there will be enough movement that you shouldn't worry too much as long as it doesn't dip below 300 (they'll start getting soggy below 300). As the process goes on you may want to turn the heat up so that it stays above 300 but you also don't want to scorch the oil and burn the fingers.
Dipping flour (aka DF) we used brown rice flour (you can use soy flour too), you can season this one or just leave it alone.
Egg wash (EW):
2 eggs (or equivalent egg replacer)
2 tbls milk
2 tblsp water
season to taste
Breading (B):
gluten free bread (we used udis white rice flour) cut into cubes
Salt
pepper
garlic powder (or any other seasonings you'd like)
Blend the ingredients in a food processor about 2-3 minutes or until it's finely minced and looks like breading.
Prepare the chicken:
One full chicken breast-both sides feeds the 4 of us, and Lucy also gets one or two. Butterfly the breast. Slice the entire breast to the desired thickness and length, the more you do this the easier it will become.
Once the breast is all cut up take several pieces at a time and dip into the DF to coat. Take from DF and place in EW and make sure the entire surface is wet from the EW. Take from the EW and place into the B making sure that all of the surface is covered. *
*Note about breading anything properly: Always have a wet hand and a dry hand. I'm right handed and always have the DF on the far left, EW in the middle and B on the far right. With my left (dry) hand I pick the chicken out of the pile and place it in the DF, grab it with my dry hand and place it in the EW. From the EW I grab it with my right (wet) hand and place it in the B. From the B I grab it with my dry hand and either place it in a bowl to be fried or put it directly into the fryer or pot with oil. When mixing in each container (DF, EW or B) make sure you are using the appropriate wet or dry hand.
Fry each batch for approximately 8-10 minutes (depending on how many you have in the frying device). Or until the pieces are floating at the top for about a minute each. If you are unsure you can pull them out of the frying liquid and temp them, they should register around 160 but they will also continue minimally cooking after they have been finished, so if it's close don't worry.
Also, please note I've been frying food for many years and eyeball a lot of things, if you aren't sure initially I would temp it or leave it in a little longer (if it starts turning black it's gone too long). We also try pieces along the way tearing them open to make sure there isn't any red but that they are also nice and juicy. This also gives you an idea of how long to cook them.
Also, if we're doing big batches we'll sometimes turn the oven to about 200 and put them in there just to warm. We typically turn it on and once it's reached the temp turn it off so the oven is just warm enough to keep them from getting cold but also it's not going to dry them out.
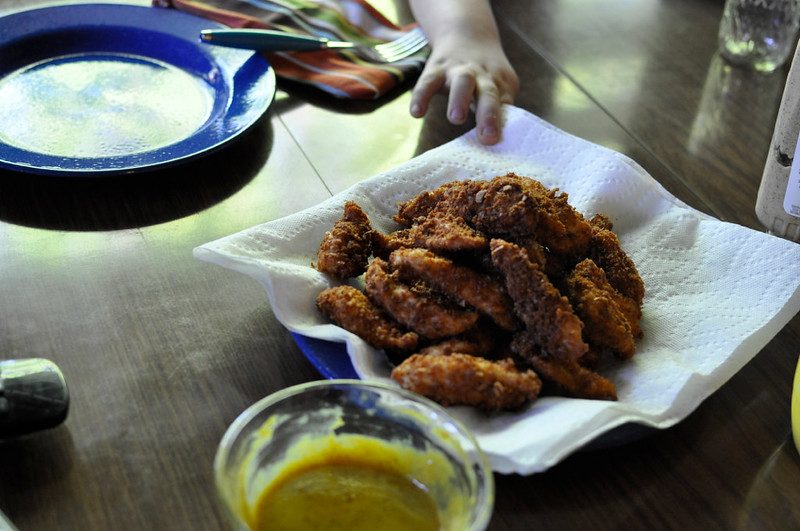
We used to make these with conventional flour and the kids loved them. They can be a bit time consuming so try it for a Friday night movie night, but also make sure to give the kids a snack once you get home so they aren't too crabby from having to wait a few more minutes for these to be done. I promise, you nor they will be disappointed.
We've also starting making our own honey mustard and though the kids haven't starting eating it we love it. We just take the desired amount of honey and mustard. We typically mix regular yellow mustard with something stone ground or spicier and then add as much honey as we like until we gain the consistency we want. You can also add some mayo to make it thicker and try some horseradish to add some more spice. Really the possibilities are endless. I also make homemade BBQ sauce, but there isn't really a recipe (see everything is free flowy).
Whatever you do, just try it, they're way better than fast food and you and your kids will be so thankful that there are options for GF chicken nuggets.

No comments:
Post a Comment